


引用第2楼選擇﹎死亡于2010-06-22 20:12发表的 :
这丑女 也能变美女了
PS将非主流美女照片处理为Q版手绘娃娃————————
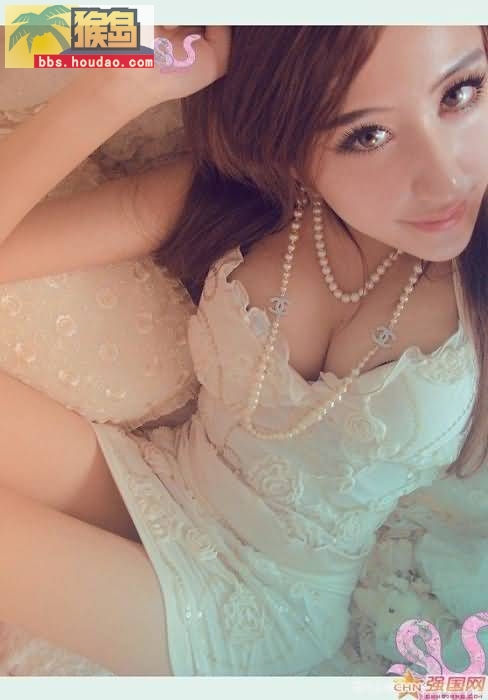
本文尝试用Photoshop将为一张大眼睛的非主流美女照片处理成可爱的Q版手绘玩具娃娃效果。重点是对五官的细节处理。 素材图片:

效果图:

详细操作步骤如下:
1、打开素材图片,创建一个新图层,然后设置画笔,设定见下图。

设置前景色:

2、使用钢笔工具画出如下图所示的路径。

3、单击鼠标右键选择搭边路径,如图所示。

4、这时看效果图会发觉线条很硬。但没关系,我们用温和一些的像皮擦出笔头跟笔尾处,让线条看起来自然些。效果如图所示。

在路径面板选择刚才勾选好的路径,然后执行第二次描边,画笔要调大些,设定值在7-9之间。单击右键选择路径描边。设定勾选模仿压力。效果如图所示。


5、创建新图层,用纯白色画笔给眼睛点上高光。效果如图所示。 画笔设定都是%一百。(记住要勾选喷笔工具,有的人可能会问勾出来不是这个效果的。其实这个效果得在你画完后用涂画工具在涂一下。不信你试试看。)
6、将眼球做好后我才开始做眼白。创建新图层拖到图层副本上方也就是空白层的最下方一层。见下图

画笔设定见下图

添加眼白后效果如图所示。(怎么做的就不用我说了吧。都跟前在的相同的,用画笔,将透明度降低点,开始涂抹)

7、创建新图层,放最上方。选取钢笔工具画出路径(加双眼皮)右键描边,不能勾选模似压力。再用像皮擦笔头跟笔尾,滤镜-模糊-高斯模糊0.2,效果如图所示。

8、创建新图层。画睫毛。钢笔工具画出如图所示的路径。

画笔大小2像素。。右键选取模似压力。效果如图所示。

下睫毛在原始图片副本上方用涂画工具涂出来就行。
9、创建新图层,用吸管工具吸取眼球最黑的色彩,用画笔工具在眉毛上方刷一层(画笔用温和的,透明度在30左右)。再用涂画工具抹出外形来(也可用像皮工具径直擦出来),效果如图所示。

下面我们对嘴巴做处理。
嘴巴的处理
1、继续做嘴巴:创建新图层,使用吸管工具吸取嘴唇最深的产色。使用钢笔工具画出嘴唇轮廓的路径(这儿忘记抓图了),设置画笔大小是2像素。然后描边路径,不勾模似压力。效果如图所示。

2、在图层副本上方。用模糊工具将嘴纯给涂均了(模糊工具设定值为100)。效果如图所示。

3、在副本上方创建新图层。给嘴巴上色彩。效果如图所示。

(因为原始图片的角度问题,feel嘴纯不是很好看,因此给更改了下。)
4、用加深减淡工具将嘴纯的暗部跟高光处理出来。效果如图所示。

这儿嘴算是处理做完了。我一般处理嘴手法相对容易(主要留意下暗部跟高光的地方就好了)。
5、鼻子我还是不怎么去细致处理的。用加深减淡工具抹下就好了。(加深减淡工具都只选中间调就好了。不然然会画面会感觉很脏

脸终于做完了。接下来我们对头发进行处理
下面我们对头发进行处理。
1、选取涂画工具,设定见下图。
涂抹出如图所示效果。

(这儿我径直用画笔将手遮住了,手法嘛。我就不说了。都相同的。全是色彩可用吸管工具来做完。
PS个人都发觉越来越没耐心了,抓图也越来越少了,原谅我吧
用图章工具将边缘看起来很乱的头发给修掉,给头发定定型。
2、给头发分层。用钢笔工具画出见下图路径

描边,取消模似压力。描完后用像皮擦下笔头就好。效果如图所示。

3、用加深减淡工具


将头发高光暗部处理出来。效果如图所示。

4、创建新图层,给头发添加暗部发丝。路径我就不抓图了。看完成效果图

5、创建新图层。给头发加高光发丝。吸管工具吸取头发亮部色彩。
6、feel头发效果不够,再建一层放最上方,给头发加点高光。
7、创建新图层,加些零乱的发丝,效果如图所示。(衣服的处理跟头发大同小异,我就不说了。整体完成了再调下色。)
效果图:
详细操作步骤如下:
1、打开素材图片,创建一个新图层,然后设置画笔,设定见下图。
设置前景色:
2、使用钢笔工具画出如下图所示的路径。
3、单击鼠标右键选择搭边路径,如图所示。
4、这时看效果图会发觉线条很硬。但没关系,我们用温和一些的像皮擦出笔头跟笔尾处,让线条看起来自然些。效果如图所示。
在路径面板选择刚才勾选好的路径,然后执行第二次描边,画笔要调大些,设定值在7-9之间。单击右键选择路径描边。设定勾选模仿压力。效果如图所示。
5、创建新图层,用纯白色画笔给眼睛点上高光。效果如图所示。 画笔设定都是%一百。(记住要勾选喷笔工具,有的人可能会问勾出来不是这个效果的。其实这个效果得在你画完后用涂画工具在涂一下。不信你试试看。)
6、将眼球做好后我才开始做眼白。创建新图层拖到图层副本上方也就是空白层的最下方一层。见下图
画笔设定见下图
添加眼白后效果如图所示。(怎么做的就不用我说了吧。都跟前在的相同的,用画笔,将透明度降低点,开始涂抹)
7、创建新图层,放最上方。选取钢笔工具画出路径(加双眼皮)右键描边,不能勾选模似压力。再用像皮擦笔头跟笔尾,滤镜-模糊-高斯模糊0.2,效果如图所示。
8、创建新图层。画睫毛。钢笔工具画出如图所示的路径。
画笔大小2像素。。右键选取模似压力。效果如图所示。
下睫毛在原始图片副本上方用涂画工具涂出来就行。
9、创建新图层,用吸管工具吸取眼球最黑的色彩,用画笔工具在眉毛上方刷一层(画笔用温和的,透明度在30左右)。再用涂画工具抹出外形来(也可用像皮工具径直擦出来),效果如图所示。
下面我们对嘴巴做处理。
嘴巴的处理
1、继续做嘴巴:创建新图层,使用吸管工具吸取嘴唇最深的产色。使用钢笔工具画出嘴唇轮廓的路径(这儿忘记抓图了),设置画笔大小是2像素。然后描边路径,不勾模似压力。效果如图所示。
2、在图层副本上方。用模糊工具将嘴纯给涂均了(模糊工具设定值为100)。效果如图所示。
3、在副本上方创建新图层。给嘴巴上色彩。效果如图所示。
(因为原始图片的角度问题,feel嘴纯不是很好看,因此给更改了下。)
4、用加深减淡工具将嘴纯的暗部跟高光处理出来。效果如图所示。
这儿嘴算是处理做完了。我一般处理嘴手法相对容易(主要留意下暗部跟高光的地方就好了)。
5、鼻子我还是不怎么去细致处理的。用加深减淡工具抹下就好了。(加深减淡工具都只选中间调就好了。不然然会画面会感觉很脏
脸终于做完了。接下来我们对头发进行处理
下面我们对头发进行处理。
1、选取涂画工具,设定见下图。
涂抹出如图所示效果。
(这儿我径直用画笔将手遮住了,手法嘛。我就不说了。都相同的。全是色彩可用吸管工具来做完。
PS个人都发觉越来越没耐心了,抓图也越来越少了,原谅我吧
用图章工具将边缘看起来很乱的头发给修掉,给头发定定型。
2、给头发分层。用钢笔工具画出见下图路径
描边,取消模似压力。描完后用像皮擦下笔头就好。效果如图所示。
3、用加深减淡工具
将头发高光暗部处理出来。效果如图所示。
4、创建新图层,给头发添加暗部发丝。路径我就不抓图了。看完成效果图
5、创建新图层。给头发加高光发丝。吸管工具吸取头发亮部色彩。
6、feel头发效果不够,再建一层放最上方,给头发加点高光。
7、创建新图层,加些零乱的发丝,效果如图所示。(衣服的处理跟头发大同小异,我就不说了。整体完成了再调下色。)

