儿童图片转手绘的方法基本一样,只是色彩方法尽量用鲜艳,清爽一点的,同时高光也尽量刻画明亮一点,这样效果才更漂亮。
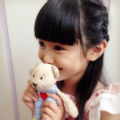
原图

最终效果

1、打开图片,选择 图像>图像大小,将图片像素改大参数如图,然后复制两个原图副本图层。


2、选择最上面的图层,选择滤镜>杂色>中间值,调5~8个值左右,然后用橡皮擦工具,擦除五官,然后向下合并图层。


3、按住,Ctrl + M调整曲线,再选择图像>调整>色彩平衡,个人喜好偏冷色的,如果有喜欢粉嫩点的,可以调整红色多点,直到自己满意为止。


4、我们开始画眼线,先新建图层,(新手最好每画一个步骤就新建一个图层,这样方面后面的调整或修改)用钢笔工具跟着原图的眼线走向画出路径。
然后用画笔工具,选择灰色,硬度100%,画笔大小为2,画笔预设记得勾选形状动态,控制钢笔压力,最小直径20%。右击路径,描边路径,勾选钢笔压力。然后再选择滤镜>墨盒>高斯墨盒,1个值。


5、新建图层,用椭圆工具按住shift拖出一个圆,尽量跟原图大小差不多。用钢笔工具把多余的眼睛部分画出来,ctrl+alt+enter建立选区,delete删除。再高斯墨盒2个值。


6、在眼珠上画出一条弧线,画笔大小调到10~12左右,颜色调成橙色或者你喜欢的颜色,描边路径。再高斯墨盒,5个值。用减淡工具到眼瞳中间刷两下,效果如图。
新建图层,笔刷颜色设为白色,大小6~8,画出高光部分。部分是用涂抹工具做出来的。


7、新建图层,我们来画上眼线,用钢笔工具勾出路径,画笔大小为10,颜色为黑色,或者80%的黑色,描边路径,勾选钢笔压力,再高斯模糊2~3个值。


8、新建图层,用钢笔工具画出眼睫毛,楼主表示画眼睫毛是渣。画笔大小调到2~3,描边路径,再高斯模糊0.5~1,透明度调整到70~80%,效果如图。然后用步骤1的方法画出双眼皮,由于原图双眼皮本身就很清晰,这一步也可以省去。


9、可以在眼角处点两点,看起来水灵点。最后为她画一个眼角高光,笔刷大小为3。

10、左眼做完后有很多图层,最好把眼睛的所有图层建立一个组,命为左眼,这样图层就不会显得太多太杂了。

11、然后用相同方法画出右眼,这里我就不再一一解说了。

12、用钢笔工具画出鼻子的轮廓,描边路径,画笔大小1或2,可以高斯模糊1个值,这样画出来的线条才不会觉得太硬了,建议用暗红的颜色,如果颜色太深,可以调低点透明度。
用相同的方法画出高光,鼻头上点一点高光,涂抹工具抹开一点,然后鼻子效果大概就是这样了,楼主也不是很会画鼻子,凑合着看吧。


13、嘴巴我通常都是复制原图的上来,用钢笔工具把嘴巴抠出来,ctrl+alt+enter建立选区,shift+F7反选,delete删除就得到了一个原图的嘴巴了。高斯模糊2~3个值。


14、用钢笔工具画出唇线,选择暗红色(笔刷大小可以设置3),描边路径(这次不需要勾选钢笔压力)。然后用钢笔工具描出需要画高光的地方,描边路径,颜色为白色,高斯模糊0.5。
嘴角可以用加深工具刷两下,最终效果如图所示。


15、先调整好原图头发的明暗,用加深工具加深头顶的头发,然后可以用涂抹工具把一些杂色的部分涂掉,这个工具蛮好用的。
用钢笔工具顺着原图头发的走向画出发丝,这个真的需要耐力,费时间。然后再选择相应的头发颜色,描边路径(记得勾选钢笔压力),可以适当的进行高斯模糊1~2个值。
记住画发丝的路径的时候不要画的太规矩,太有条理了,两条线一个叉会比较好。描边路径后的头发记得新建一个图层,然后调低透明度让头发更自然。
然后依次画出明暗,从暗色到明色,最后画高光发丝,高光发丝不需要太多,画个几丝拉几缕就够了。


16、我们回到原图,画皮肤。到原图上方新建一个图层,把皮肤的眼袋去掉,按住alt吸取附近的皮肤颜色,设置合适的笔刷大小,硬度为0%,透明度50%~60%,到不干净的地方刷两下(红色圈住部分)。干净透亮的皮肤就出来了。


17、把副本图影藏,然后用钢笔工具抠出背景部分,建立选区,羽化8个值左右,填充背景色。
你也可以换自己喜欢的背景。


18、在背景图层上再新建图层。把原图复制一份到最上面,跟着原图的脸的轮廓勾出线条。


19、把衣服和手的轮廓用钢笔工具勾勒出来,这是个细活,要有耐心来勾,楼主没法一一的把线条勾出来,最后大概就是这样的效果。


最终效果:

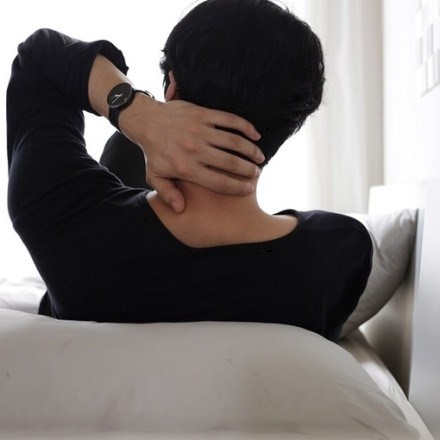
原图
最终效果
1、打开图片,选择 图像>图像大小,将图片像素改大参数如图,然后复制两个原图副本图层。
2、选择最上面的图层,选择滤镜>杂色>中间值,调5~8个值左右,然后用橡皮擦工具,擦除五官,然后向下合并图层。
3、按住,Ctrl + M调整曲线,再选择图像>调整>色彩平衡,个人喜好偏冷色的,如果有喜欢粉嫩点的,可以调整红色多点,直到自己满意为止。
4、我们开始画眼线,先新建图层,(新手最好每画一个步骤就新建一个图层,这样方面后面的调整或修改)用钢笔工具跟着原图的眼线走向画出路径。
然后用画笔工具,选择灰色,硬度100%,画笔大小为2,画笔预设记得勾选形状动态,控制钢笔压力,最小直径20%。右击路径,描边路径,勾选钢笔压力。然后再选择滤镜>墨盒>高斯墨盒,1个值。
5、新建图层,用椭圆工具按住shift拖出一个圆,尽量跟原图大小差不多。用钢笔工具把多余的眼睛部分画出来,ctrl+alt+enter建立选区,delete删除。再高斯墨盒2个值。
6、在眼珠上画出一条弧线,画笔大小调到10~12左右,颜色调成橙色或者你喜欢的颜色,描边路径。再高斯墨盒,5个值。用减淡工具到眼瞳中间刷两下,效果如图。
新建图层,笔刷颜色设为白色,大小6~8,画出高光部分。部分是用涂抹工具做出来的。
7、新建图层,我们来画上眼线,用钢笔工具勾出路径,画笔大小为10,颜色为黑色,或者80%的黑色,描边路径,勾选钢笔压力,再高斯模糊2~3个值。
8、新建图层,用钢笔工具画出眼睫毛,楼主表示画眼睫毛是渣。画笔大小调到2~3,描边路径,再高斯模糊0.5~1,透明度调整到70~80%,效果如图。然后用步骤1的方法画出双眼皮,由于原图双眼皮本身就很清晰,这一步也可以省去。
9、可以在眼角处点两点,看起来水灵点。最后为她画一个眼角高光,笔刷大小为3。
10、左眼做完后有很多图层,最好把眼睛的所有图层建立一个组,命为左眼,这样图层就不会显得太多太杂了。
11、然后用相同方法画出右眼,这里我就不再一一解说了。
12、用钢笔工具画出鼻子的轮廓,描边路径,画笔大小1或2,可以高斯模糊1个值,这样画出来的线条才不会觉得太硬了,建议用暗红的颜色,如果颜色太深,可以调低点透明度。
用相同的方法画出高光,鼻头上点一点高光,涂抹工具抹开一点,然后鼻子效果大概就是这样了,楼主也不是很会画鼻子,凑合着看吧。
13、嘴巴我通常都是复制原图的上来,用钢笔工具把嘴巴抠出来,ctrl+alt+enter建立选区,shift+F7反选,delete删除就得到了一个原图的嘴巴了。高斯模糊2~3个值。
14、用钢笔工具画出唇线,选择暗红色(笔刷大小可以设置3),描边路径(这次不需要勾选钢笔压力)。然后用钢笔工具描出需要画高光的地方,描边路径,颜色为白色,高斯模糊0.5。
嘴角可以用加深工具刷两下,最终效果如图所示。
15、先调整好原图头发的明暗,用加深工具加深头顶的头发,然后可以用涂抹工具把一些杂色的部分涂掉,这个工具蛮好用的。
用钢笔工具顺着原图头发的走向画出发丝,这个真的需要耐力,费时间。然后再选择相应的头发颜色,描边路径(记得勾选钢笔压力),可以适当的进行高斯模糊1~2个值。
记住画发丝的路径的时候不要画的太规矩,太有条理了,两条线一个叉会比较好。描边路径后的头发记得新建一个图层,然后调低透明度让头发更自然。
然后依次画出明暗,从暗色到明色,最后画高光发丝,高光发丝不需要太多,画个几丝拉几缕就够了。
16、我们回到原图,画皮肤。到原图上方新建一个图层,把皮肤的眼袋去掉,按住alt吸取附近的皮肤颜色,设置合适的笔刷大小,硬度为0%,透明度50%~60%,到不干净的地方刷两下(红色圈住部分)。干净透亮的皮肤就出来了。
17、把副本图影藏,然后用钢笔工具抠出背景部分,建立选区,羽化8个值左右,填充背景色。
你也可以换自己喜欢的背景。
18、在背景图层上再新建图层。把原图复制一份到最上面,跟着原图的脸的轮廓勾出线条。
19、把衣服和手的轮廓用钢笔工具勾勒出来,这是个细活,要有耐心来勾,楼主没法一一的把线条勾出来,最后大概就是这样的效果。
最终效果:
 大神
大神